

Plumbing Inspection Checklist Templates
Template Library > Construction Inspections > Plumbing Inspections
What These Plumbing Inspection Checklists Cover
Plumbing inspection checklist templates give licensed plumbers, property managers, and facilities teams a structured way to assess, document, and report on every part of a property’s plumbing system. Our templates are organised by system, so every area from the water supply and DWV network through to final safety sign-off has a defined place in the property inspection process.
Use these plumbing inspection checklist templates to:
- Document findings across all major plumbing systems, with photos and comments attached to each item
- Assign corrective actions to the right contractor or maintenance team, with due dates and clear accountability
- Generate a signed PDF inspection report to share with property owners, tenants, or compliance teams
- Track resolution progress across multiple properties or sites, from any mobile device

With the GoAudits Construction Inspection App, you can:
- Eliminate paperwork: conduct efficient digital audits, add photos from mobile device
- Customize this template or easily create your own
- Save time with instant reports & assign corrective actions
General Information & Documentation
Water Supply System
Drainage, Waste, And Vent (DWV) System
Fixtures And Appliances
Water Heater And Hot Water System
Sewage And Septic Systems (If Applicable)
Final Assessment And Safety Checks
General Information & Documentation
Water Supply System
Drainage, Waste, And Vent (DWV) System
Fixtures And Appliances
Water Heater And Hot Water System
Sewage And Septic Systems (If Applicable)
Final Assessment And Safety Checks
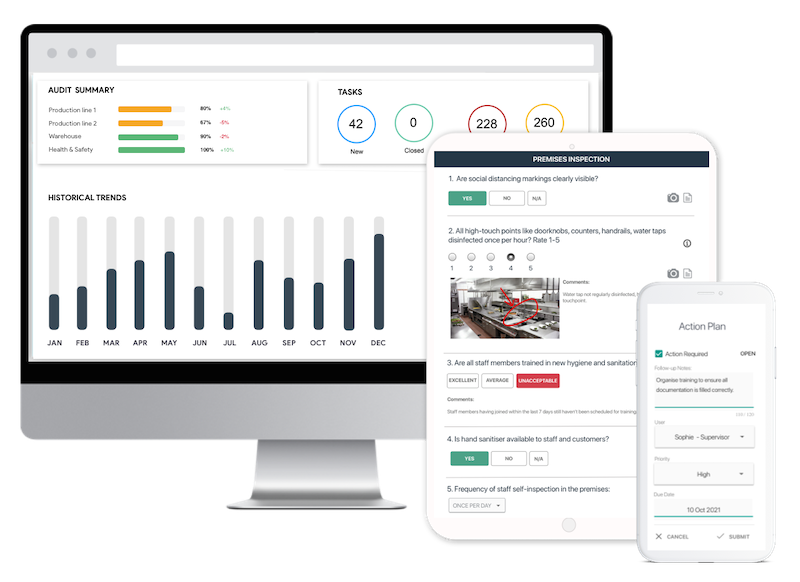
Save Time with Digital Inspections
- Easily capture & attach photos, directly on your mobile device.
- Instantly generate and share detailed reports after the inspection.
- Track corrective actions, view historical trends, improve standards.


What Is a Plumbing Inspection Checklist?
A plumbing inspection checklist is a structured document used by licensed plumbers, inspectors, and facilities teams to assess the condition of a property’s plumbing system. It records findings across all major components: supply lines, drainage, fixtures, water heaters, and sewage, flagging issues such as leaks, corrosion, pressure failures, and code non-compliance.
Both residential and commercial buildings use these checklists to support preventive maintenance, regulatory compliance, and pre-purchase due diligence.
What Should a Plumbing Inspection Checklist Include?
A thorough plumbing inspection checklist covers seven areas. Each maps to a distinct part of the plumbing system, and skipping any one of them risks missing problems that are expensive to fix after the fact. The GoAudits plumbing inspection report template is organised around all seven.
General Information and Documentation
This section confirms the legal and administrative foundation of the work:
- Has the plumbing system been installed according to approved plans and building codes?
- Are current permits and inspection documents on file?
- Is the licensed plumber’s certification included in the report?
- Have previous repairs or defects been documented prior to this inspection?
Inspections conducted without verifying permits or approved drawings can miss installation deviations that would otherwise fail a code review. For guidance on structuring the full report after inspection, see our guide to home inspection reports.
Water Supply System
Here, inspectors verify that potable water reaches fixtures at safe, consistent pressure without contamination risk.
- Supply lines are properly connected, labelled, and leak-free
- Water pressure is within the acceptable range (typically 40–80 psi)
- Shut-off valves are present, accessible, and operational at all key fixture points
- The main water supply valve is functional and reachable in an emergency
- Backflow prevention devices are installed and working where required
Low pressure at one fixture may point to a localised blockage. Low pressure across the building usually signals a supply line issue or failing pressure-reducing valve.
Drainage, Waste, and Vent (DWV) System
The DWV system is one of the most overlooked areas in routine inspections, and one of the most consequential when things go wrong.
- All drains have correct slope and are free from blockages
- P-traps are installed under sinks, tubs, and floor drains as required
- Vent stacks are unobstructed and extend above the roofline
- The DWV system is free from leaks, corrosion, or loose fittings
- A water or smoke test has been conducted to check for hidden leaks
For inspections that also cover buried pipework, the underground plumbing inspection checklist covers trench depth, bedding, pipe testing, and cleanout access for sub-surface lines.
Fixtures and Appliances
Every fixture gets checked for mounting, function, and water delivery.
- Sinks, toilets, bathtubs, and showers are securely mounted and operating correctly
- Hot water reaches fixtures within a reasonable time from activation
- Toilets flush properly and do not run continuously
- Faucets and valves operate without drips or visible wear
- Dishwashers, washing machines, and water heaters are properly connected and vented
A continuously running toilet can waste hundreds of gallons per day. Catching it on inspection prevents both water waste and a significant utility cost.
Water Heater and Hot Water System
Water heaters carry specific safety requirements that inspectors must check regardless of unit age.
- The unit is installed with correct clearance, anchoring, and safety features
- The temperature and pressure relief (TPR) valve is installed and tested
- Temperature is set within safe limits (generally 49–60°C / 120–140°F)
- No rust, leaks, or deterioration visible on or around the tank
- Pipes to and from the heater are insulated and securely attached
The TPR valve is a safety-critical component. A dripping or failed TPR valve is not a minor maintenance item. It indicates excess system pressure and needs immediate attention.
Sewage and Septic Systems
This part focuses on properties with either a municipal sewer connection or a private septic system.
- The sewage connection to the municipal line or septic system is intact and compliant
- Septic tanks and drainage fields show no evidence of overflow or blockage
- No foul odour, slow drainage, or gurgling sounds that indicate a system issue
- Sewer cleanouts are accessible and properly capped
Septic systems typically require a professional inspection every two to three years, depending on tank size and household usage. Gurgling drains or unexplained wet patches near the drain field are early warning signs worth adding to your plumbing maintenance checklist immediately.
Final Safety Checks
The final section confirms that the plumbing system as a whole is safe, code-compliant, and documented.
- No signs of water damage, mould, or corrosion around plumbing components
- Pipe materials are appropriate for the building type and consistent throughout
- All visible connections have passed pressure and leak tests
- Firestop systems are in place where plumbing penetrates fire-rated walls or floors
- All safety recommendations and required repairs are noted for follow-up
👉 GoAudits Property Inspection App: For property managers running broader building assessments, the app covers electrical, structural, HVAC, and plumbing checks across your entire portfolio, using the same mobile-first workflow.
What is the difference between a residential and commercial plumbing inspection?
A residential plumbing inspection checklist focuses on household fixtures, a single water meter, and one connection to the municipal sewer or septic system. A commercial plumbing inspection checklist is significantly more complex and covers multiple zones, pressure testing across floors, high-volume fixture assessment, grease interceptors, booster pumps, backflow device certification, and compliance with commercial plumbing codes, which carry specific documentation requirements.
The same seven-area framework applies to both residential and commercial inspections, but the scope, frequency, and complexity differ significantly:
Residential Plumbing Inspection Checklist
A residential plumbing inspection checklist focuses on the fixtures and systems a household uses daily: kitchen and bathroom fixtures, the water heater, outdoor spigots, and the connection to either the municipal sewer or a private septic tank.
Inspections typically follow the flow of water through the property, from the main shut-off valve at the meter, through supply lines, to individual fixtures, and out through the drainage system. A standard residential plumbing inspection takes two to three hours for a standard home.
Commercial Plumbing Inspection Checklist
A commercial plumbing inspection checklist covers far more ground. Multi-storey buildings require pressure checks across floors. High-traffic restrooms and kitchens demand closer attention to fixture wear, drain performance, and grease interceptor condition.
Facilities with cooling systems, booster pumps, or fire suppression-adjacent plumbing add further complexity. Backflow prevention devices in commercial buildings typically require annual certified testing as a regulatory requirement, independent of any broader inspection schedule.
Teams running a full site assessment can also use our commercial building inspection checklist templates to cover all building systems in a single walkthrough.
👉 GoAudits Construction Inspection Software: Manage plumbing inspections alongside structural, electrical, and safety checks built for multi-site and multi-trade operations.
How Often Should a Plumbing System Be Inspected?
For most residential properties, an annual plumbing inspection is the right baseline. Older homes with galvanised or cast iron pipes, rental properties with high fixture turnover, and homes near mature trees with deep root systems benefit from more frequent checks, potentially every six months.
For commercial and facilities settings, the schedule should be risk-based:
Monthly: Water pressure, grease interceptor levels, and any fixtures showing previous issues
Quarterly: Full zone walkthrough for facilities above 50,000 sq ft; high-traffic restrooms and kitchens
Semi-annually: Full facility inspection for smaller commercial properties
Annually: Backflow preventer certification, regardless of facility size. Local water authority requirements take precedence over any internal schedule
Seasonal timing matters too. Insulation on exposed pipes and water heater performance should be checked before winter. Expansion tanks and supply lines connected to cooling systems need attention before summer.
For inspectors running a full building assessment, our building inspection checklist templates cover structural, electrical, and safety systems alongside plumbing in one audit.
How to Conduct a Plumbing Inspection: Step by Step
Step 1: Review Permits and Documentation
Before touching a single fixture, confirm that the plumbing system was installed under a valid permit, that approved drawings are on file, and that the licensed plumber’s credentials are documented. This step protects both the inspector and the property owner if questions arise later.
Step 2: Test Water Supply Pressure and Shut-Off Valves
Use a pressure gauge to confirm the incoming supply is within the 40–80 psi range. Test every shut-off valve at the main, at individual fixtures, and at any zone isolation points. A valve that won’t move freely is a liability in an emergency.
Step 3: Inspect the DWV System
Run water through every fixture while checking drain speed, listening for gurgling, and looking for any signs of trap failure or vent blockage. Where accessible, conduct a smoke or water test to confirm the system is sealed. Check vent stacks for obstructions at the roofline.
Step 4: Check Fixtures and Appliances
Work room by room. Test every faucet, toilet, shower, and appliance connection. Look under sinks for moisture, staining, or P-trap corrosion. Check that hot water arrives at each fixture within a reasonable time. Delayed delivery can signal a failing recirculation system or undersized heater.
Step 5: Assess the Water Heater
Check the TPR valve, verify temperature settings, look for rust or sediment around the base, and confirm that supply and return pipes are properly insulated. Check the installation date. Most tank water heaters have an expected service life of 8 to 12 years.
Step 6: Evaluate Sewage and Septic Systems
Inspect all visible sewer lines and cleanout access points. For properties on septic, check the tank and drain field for signs of overflow, odour, or unusual ground saturation. Confirm cleanout caps are sealed and accessible.
Step 7: Complete the Final Safety Assessment and Report
Run pressure and leak tests on all visible connections. Confirm pipe materials are consistent and appropriate for the building. Document every finding with photos and notes, assign any corrective actions, and generate a signed plumbing inspection report.
For post-installation sign-off on new builds, the plumbing commissioning checklist covers IPC/UPC code compliance, red line drawing review, and LOTO procedures.

Why Use a Digital Plumbing Inspection Checklist for Reports?
GoAudits gives licensed plumbers, property managers, and facilities teams a mobile platform to run plumbing inspections across any number of properties, with photo documentation, corrective actions, and professional reports built into every inspection.
Capture photo evidence on-site – Attach annotated photos directly to checklist items: leaking joints, corroded valves, failed TPR valves. Findings are clear in the report without any post-inspection write-up.
Generate signed reports in seconds – Once the inspection is complete, a formatted PDF report is ready to share with property owners, tenants, or compliance teams before you leave the building.
Assign corrective actions immediately – Flag a failed pressure test or a blocked drain and assign the follow-up task to the right person with a due date, all from the same app.
Track inspection history across multiple sites – View trends across properties, compare scores over time, and identify repeat issues before they become recurring failures.
Work offline, anywhere – No signal on site is not a problem. GoAudits runs fully offline and syncs automatically when connectivity returns.

Frequently Asked Questions
What does a plumbing inspection checklist include?
A plumbing inspection checklist covers seven core areas: general documentation and permit verification, water supply lines and pressure, the drainage, waste, and vent (DWV) system, fixtures and appliances, the water heater, sewage and septic systems, and a final safety assessment. Each section records findings, supports photo evidence, and flags items for corrective action.
How often should a plumbing system be inspected?
Residential plumbing should be inspected annually as a baseline, with more frequent checks for older homes, rental properties, and buildings near large trees. Commercial facilities should run monthly spot-checks on high-risk zones, quarterly or semi-annual full inspections depending on facility size, and annual certified testing for backflow prevention devices, independent of any other inspection schedule.
Can a plumbing inspection checklist be used for new construction and existing buildings?
Yes. For new construction, plumbing inspections run in three phases: rough-in (before walls close), top-out (once the full pipe network is installed), and final trim-out (after fixtures are in place). For existing buildings, the same checklist framework applies to routine preventive maintenance, pre-purchase assessments, and annual compliance checks. The GoAudits template is fully customisable for either context.
What are the most common issues found during a plumbing inspection?
The most common findings in a home plumbing inspection checklist include leaking supply lines or drain connections, low water pressure caused by corroded pipes or a failing pressure-reducing valve, faulty or stiff shut-off valves, DWV blockages or missing P-traps, and water heater issues such as sediment build-up, incorrect temperature settings, or a dripping TPR valve. In commercial inspections, dry floor drain traps, grease interceptor overflows, and backflow device failures are also frequently cited.
Other Popular Plumbing Inspection Checklists:

Digitize your Site Inspections
- Easily perform audits anywhere on the site using a mobile device, even offline
- Attach photos to document issues or prove compliance
- Assign tasks, set deadlines and track progress - all within a single app
- Analyze data from audits to identify trends, pinpoint recurring issues, and assess compliance levels.