Key Takeaways
- Site inspection reports help document safety hazards and potential problems, ensure accountability, and support decision-making.
- Manual reporting poses a major challenge for inspectors as it makes the process of drafting and sharing the reports tedious, time-consuming, and prone to error.
- With a site inspection and reporting app, you can collect data, generate reports, and share them with stakeholders —instantly and on-site.
Accurate and on-time site inspection reports ensure projects are completed safely, on time, and within budget. Moreover, they are indispensable for project management teams as they facilitate informed decision-making, proactive problem-solving, and the prevention of costly delays and rework.
In this article, we’ll focus on how to write site inspection reports, the importance of using checklists, and how site inspection apps reduce reporting time from hours to just a few minutes.
What is a Site Inspection Report?
A site inspection is a structured walkthrough of a location to check its condition, safety, and compliance against a defined standard. A site inspection report is the written output of that walkthrough: what was checked, what was found, and what needs to happen next. One is the activity; the other is the record that proves it took place.
A site inspection report is a crucial tool for recording key findings from a visual inspection of a job site. It summarizes the risks and hazards identified and the preventive mechanisms in place. An effective site inspection report helps managers ensure compliance with local regulations and assess environmental impacts to obtain necessary approvals.
The same document goes by several names depending on the setting. A facility inspection report covers a building’s condition and systems. A compliance inspection report records whether a site meets a specific regulatory or contractual standard. Site reports and inspection records are the broader terms for the same output. The structure below applies to all of them.
Why Site Inspection Reports Are Important
Site inspection reports are essential for several reasons:
- Documentation of Observations: They provide a detailed account of the site’s current conditions, including any identified issues or deviations from standards.
- Accountability and Transparency: By documenting findings, these reports hold parties responsible for addressing identified issues and promoting transparency in operations.
- Historical Reference: They serve as a record for future reference, helping to track changes over time and assess the effectiveness of corrective actions.
- Decision-Making Support: Detailed reports assist stakeholders in making informed decisions regarding resource allocation, project timelines, and necessary interventions.
- Legal Evidence: In case of disputes or legal matters, these reports can serve as evidence of compliance efforts and due diligence.
How to Write a Site Inspection Report
Writing a site inspection report is mostly a matter of recording things in the right order and resisting the urge to editorialise. Here is the method.
- Fill in the header before you start walking. Site name, location, date, time, weather, who is present, and what the inspection covers. Doing this on site rather than afterwards is what makes the report contemporaneous.
- Work through a checklist, not from memory. A structured checklist means the same areas get covered, whoever inspects, and it stops the report from reflecting only what happened to catch your eye.
- Record what you observed, not what you concluded. “Guardrail missing on the north scaffold, level 3” is a finding. “Scaffolding looks unsafe” is an opinion, and it is the sentence that gets challenged. Specific location, specific condition.
- Photograph each finding as you record it. A photo taken at the moment of observation, attached to the item it documents, is worth more than a folder of images matched up later.
- Rate severity consistently. Use the same scale across every report, so a “high” on one site means the same as a “high” on another. Without that, findings cannot be compared or prioritised.
- Assign an owner and a deadline to every action. A finding with no name against it will still be open at the next inspection.
- Separate observations from recommendations. What you saw is fact. What should be done about it is judgement. Mixing them weakens both.
- Issue it the same day. A report written a week later describes a site that has changed, and its value as evidence falls accordingly.

Use Industry-Specific Site Inspection Checklists
Depending on the type of inspection, site inspections can involve a few to multiple checkpoints. Moreover, a medium to large project may require several inspections conducted by different individuals. In such cases, standardizing inspections and reporting becomes a challenge. An inspector may miss out on some specific points, or there may be inconsistencies in final reports, depending on who performs the inspection.
A site inspection checklist can solve this problem. As a project manager, you can customize checklists based on the project requirements and mandate your inspectors to use them. This will help inspectors cover all checkpoints and facilitate standardized inspections regardless of who performs them.

With a digital inspection checklist app like GoAudits, you can make updates and ensure they sync in real time across all existing checklists. GoAudits also offers a library of free industry-specific checklists to help you get started.
Here are a few examples of GoAudits on-site inspection checklists:
- Construction Site Inspection Checklist
- Hotel Site Inspection Checklist
- Walkthrough Checklist Template
- Pre-Event Site Inspection Checklist

Site Inspection Report Format: What the Template Looks Like
Most site inspection report templates follow the same structure regardless of industry. The detail changes; the sections do not.
Header block
- Report title and reference number
- Site name and full address
- Date and time of inspection
- Weather and site conditions
- Inspector name, role, and company
- Persons present during the inspection
- Scope: what this inspection covered, and what it did not
Section 1: Summary. Two or three lines on the overall condition and the most significant finding. Written last, read first.
Section 2: Areas inspected. Each area or system in turn, with its status and any observations. Keep the order consistent between reports so readers can compare.
Section 3: Findings. For each one: a reference number, location, description of what was observed, severity rating, photograph, and the standard or specification it fails against where applicable, plus a plan or floor reference where the site is large enough that a written location could be ambiguous.
Defining your severity scale. Ratings only work if everyone uses them the same way. A workable three-level scale:
- High means stop work or make safe immediately
- Medium means fix within a defined period with the work continuing
- Low means address at the next scheduled opportunity.
Agree the scale before the first inspection rather than during it, and when a finding sits between two levels, take the higher one. Downgrading a rating later is easier than explaining why a serious issue was under-rated.
Section 4: Actions required. Each finding paired with a corrective action, a named owner, and a target date.
Section 5: Outstanding items from previous inspections. What was raised last time and whether it was closed. This is the section most templates omit, and most disputes turn on.
Sign-off. Inspector signature and date, plus acknowledgement from the site manager or principal contractor. This is not a formality: an unsigned report is straightforward to dispute later, and the acknowledgement is what evidences the findings were communicated rather than merely recorded.
Attachments. Photographs, test certificates, and any supporting documents, each labelled and referenced from the finding it relates to.
A report following this structure works for a construction site, a facility, a warehouse, or a hotel. What changes is the checklist behind Section 2, not the format of the report.
Site Inspection Report Template Sample PDF
Here’s an example of a checklist-based site inspection report sample generated with GoAudits.
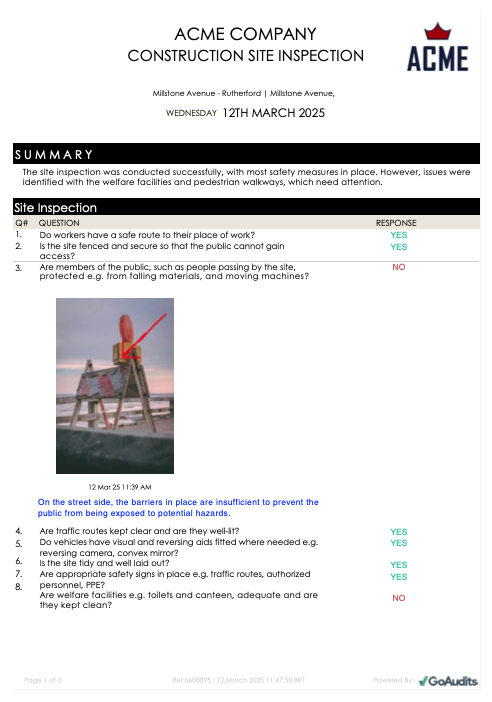
Most teams start with a Word or Excel site inspection report template, which works for a one-off. The friction appears with volume: photos live separately from findings, each report gets typed up after the visit, and once several inspectors hold their own copy the severity ratings stop meaning the same thing. The template above is a PDF because it is the output rather than the input, generated from a completed checklist with the photos already attached.
Eliminate Manual Creation of Site Inspection Reports
Drafting site inspection reports manually poses serious challenges that can hinder workflows and cause delays. Here are some of the key challenges of site inspection reporting:
- Time-Consuming Process: Once the site visits are complete, in many cases, inspectors have to return to their office and spend hours compiling all the findings into a report, potentially browsing multiple spreadsheets, photo galleries, and paper notes.
- Chances of Error: In most cases, inspectors are required to type out these reports manually, which can be frustrating and prone to errors, such as misplacing a piece of information or attaching an incorrect photo.
- Cumbersome and Delayed Approvals: Some projects require multiple stakeholders to review and sign the report. Each individual is required to download, sign, and forward the report to the next member. This process is inefficient, often leading to lengthy email chains and delays in final decision-making.
A site inspection mobile app like GoAudits can help you tackle these challenges.

With GoAudits, inspectors can perform on-site inspections (even offline) and generate instant professional reports that can be shared within the app.
As a project manager, you can set up workflows defining who needs to receive the reports for further approvals, ensuring nobody wastes time downloading and signing them manually.
You can even set deadlines and reminders and take follow-ups to avoid delays. The best part: you can monitor everything related to inspections and reporting through the admin dashboard.
A big win for us was the speed at which we can conduct an audit and produce a report: the entire process is now much faster.
Stacy Steward, Program Director, FiberRise
Case Study: How FibreRise leverages GoAudits to automate site inspection reporting and simplify quality control.
Streamline Site Inspections and Reporting With GoAudits
GoAudits is a site inspection & reporting software that allows project managers to do their best work while meeting the safest and highest quality control standards. Its scalable features enable managers to streamline processes, eliminate communication bottlenecks, enhance resource utilization, and handle multiple projects.
With GoAudits, you can:
- Create custom site inspection checklists.
- Schedule all types of inspections and site visits.
- Perform checks using the GoAudits mobile app, even in locations with limited internet connectivity.
- Assign corrective actions and ensure their on-time completion.
- Make sure all stakeholders stay updated through instant on-site reporting.
- Monitor adherence to all safety, quality, and operational standards.
With a rating of 4.8 stars on Capterra, GoAudits is trusted by some of the biggest names in the industry.
» GoAudits Reviews: Read how companies leverage GoAudits to meet standards in their operations and quality.
FAQs
A site inspection is a structured walkthrough of a location to check its condition, safety, and compliance against a defined standard. The report is the written output of it.
A site report is the written record produced after a site visit or inspection, documenting conditions observed, issues found, and actions required. Site inspection report, site visit report, and site report are often used interchangeably, though a site visit report tends to be broader and may cover progress and attendance as well as condition.
A structured list of the items to check during a walkthrough, used to keep inspections consistent between inspectors and across visits. The checklist drives the inspection; the report records what it found.
Automatically, at the point the inspection is submitted. Digital inspection apps generate the report on completion and email it to a defined distribution list, so findings reach the people who need to act the same day rather than waiting for a write-up.
Long enough to record every finding clearly and no longer. A routine weekly walkthrough might produce two pages; a pre-handover inspection could run to twenty. If a report needs padding to look thorough, the checklist behind it is the problem rather than the report.